

Views: 0 Author: Site Editor Publish Time: 2025-11-12 Origin: Site


You want to know how to install ground mount solar panels. Start by planning every step. Use the right tools and materials for solar projects. Make sure you get permits and follow local rules. Safety matters most. Watch for trips, falls, electrical risks, strains from lifting, and weather issues like heat or cold stress. Electrical hazards can happen, such as shock from energized conductors, short circuits, or improper grounding. Rapid shutdown systems help protect you during emergencies. If you like DIY, you can find solar kits and expert advice at Haina Solar.
Begin with good planning. Know your space and sunlight. Learn about local rules before you start installing solar panels.
Pick the best solar panels. Monocrystalline panels work better and look nice. Many people choose them for their solar systems.
Get all needed permits early. Look at building codes and HOA rules. This helps you avoid problems when installing.
Get the ground ready. Clear the area and make it flat. This gives your solar panels a strong base and helps them last longer.
Use strong materials for your mount. Pick wood or metal that is tough. Make sure your frame can handle bad weather.
Attach your solar panels tightly. Use fasteners that do not rust. Check that the panels are lined up right to get the most energy.
Take care of your solar panels often. Clean them every few months. Look for damage to keep your system working well.
Ask for expert help if you need it. If you have big problems or need advice, contact professionals like Haina Solar for help.
Getting ready for a solar panel installation takes careful planning. You want to make sure every step goes smoothly. This step-by-step guide will help you pick the right panels, understand the process, and follow all the rules. Let’s break down the solar panel installation steps so you can start your solar journey with confidence.
Picking the right solar panels is the first step. You need to think about your space, sunlight, and how much energy you want. Here are some things to keep in mind:
South-facing areas get the most sunlight. This makes them the best spot for solar panel installation.
Your region matters. Some places get more sun than others, so check your local weather.
Look at your yard or open space. Make sure you have enough room for the solar panel installation process.
Watch out for trees or buildings that might block the sun.
If you live in a neighborhood with a homeowners association, check their rules before you start the process.
You can choose between standard and custom panels for your solar panel installation. Most people use monocrystalline panels. They work well and look nice. Here’s a quick look at popular options:
Configuration | Number of Panels | Orientation | Tilt Angle |
|---|---|---|---|
4x3 | 12 | Landscape | 20 degrees |
5x4 | 20 | Landscape | 20 degrees |
Monocrystalline panels have an efficiency of 15% to 20%. Polycrystalline panels are a bit less efficient, at 10% to 15%. If you want the best performance, go with monocrystalline panels for your solar panel installation steps.
Many people like to use DIY kits for their solar panel installation. Kits make the process easier and save money. You can cut costs by more than half compared to hiring a pro. Haina Solar offers kits and support to help you with every step.
Permits are a big part of the solar panel installation process. Rules change from place to place. Some areas have strict building codes or zoning laws. You might need special permission if your solar panel installation is near a highway or in a historic area. Always check with your local office before you start any step. If you live in California, you might pay less for permits. Other states can cost more. Homeowners associations may also have their own rules.
Tip: Get your permits sorted out before you start any solar panel installation steps. This will save you time and trouble later.
A typical DIY solar kit comes with steel posts, rails, clamps, and hardware. These parts help you build the frame for your solar panel installation. Most kits do not include the actual solar panels, cables, inverters, or concrete. You will need to buy those separately. Haina Solar can help you pick the right kit and guide you through each step of the solar panel installation process.
If you follow each step in this step-by-step guide, you will make your solar panel installation much easier. Planning is the most important step. Take your time, check your space, and get the right permits. Haina Solar is always ready to help you with products and advice for every step of your solar panel installation.
Getting your ground ready is a big part of any solar project. You want a strong base for your solar panels. Good preparation helps your solar system last longer and work better.
Before you start, look at your land. Is it flat or sloped? Are there trees or bushes in the way? You need a clear, level spot for your solar array. Try to keep the area as natural as possible. Remove only the plants and rocks that block your solar panels. If you have a lot of trees, clear them so you get more sunlight. On steep slopes, make sure your solar panels have enough ground clearance. This keeps them safe from hitting the ground.
You will need some basic tools for this step. Here’s a quick list:
Shovel and rake for moving dirt and rocks
Level to check the ground
Tape measure for marking spots
String or chalk for layout lines
Wheelbarrow for hauling debris
Post hole digger if you use posts for your solar mount
If you use concrete footings, get ready for a footing inspection. Concrete sleepers can help you install solar panels fast, but you must make sure the ground is level first.
Safety comes first. Always wear gloves and sturdy boots. Watch out for sharp rocks and roots. Keep a safe perimeter around your solar site. Clear away dry grass and brush to lower fire risk. If your land floods, pick a spot that stays dry. Avoid water wash areas and flood zones. Set up paths for your equipment so you don’t compact the soil too much. If you work on a slope, move slowly and keep your footing.
Tip: Prepare a Stormwater Pollution Prevention Plan (SWPPP) to control erosion and keep your solar site safe.
Now you need to mark where your solar panels will go. Use your tape measure and string to lay out the rows. Make sure your solar array faces south for the most sunlight. Check for shadows from trees or buildings. You want your solar panels to get sun all day.
Sunlight is key for solar power. Face your solar panels south if you live in the northern hemisphere. This gives you the most energy. Keep your solar array away from shade. Even a little shade can lower your solar output. Mark your layout so each solar panel gets full sun.
The ground under your solar panels must be stable. Soil type matters a lot. Here’s a table to help you pick the right foundation for your solar mount:
Foundation Type | Soil Condition | Key Features |
|---|---|---|
Concrete Foundations | Rocky or uneven terrain | Strong base, takes longer to set up |
Anchor Foundations | Soft soils | Quick, less digging, good for soft ground |
Driven Piles | Various | Fast, strong, resists frost heave |
Ground Screws | Soft to moderate soils | Quick, holds tight, works in many places |
Ballasted Systems | Sensitive areas | No digging, uses weight for stability |
Earth Anchors | Temporary setups | Fast, handles wind and snow well |
If you use a pre-designed solar mounting structure, you get better stability. Always check your local rules about how close your solar panels can be to property lines or buildings. Make sure your solar site meets all safety requirements.
Note: Good ground preparation helps your solar panels last longer and work better. Take your time and do it right.
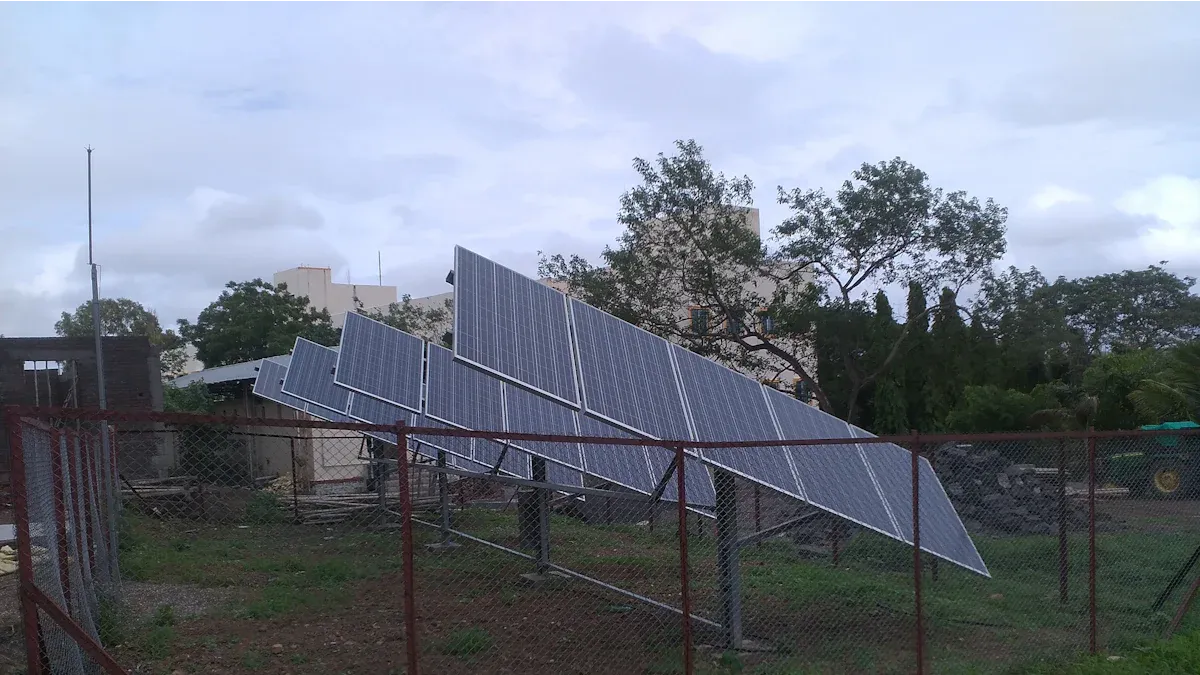
Building a strong frame is the heart of your ground mount solar project. You want your solar panels to stay secure and work for years. Let’s look at two popular ways to build your mount: using 2x4 lumber and anchoring metal poles.
You can use 2x4 lumber to build a sturdy frame for your solar panels. Many DIYers like this method because it’s simple and affordable. You can find 2x4s at any hardware store. Pressure-treated wood works best for outdoor projects. It stands up to rain, sun, and bugs.
Start by measuring your space. Lay out your 2x4s to match the size of your solar array. Cut the boards to fit your design. Use screws or bolts to connect the pieces. Make sure the frame is square and level. You want each solar panel to sit flat and get full sunlight.
Here’s a basic step-by-step guide for assembling your mount:
Lay out the perimeter of your frame with 2x4s.
Attach cross supports to hold the weight of your solar panels.
Secure the joints with galvanized screws or bolts.
Check that the frame is level before you add your solar panels.
Use brackets or clamps to fasten the panels to the frame.
Tip: Double-check your measurements before you cut any wood. A square frame helps your solar panels line up and look neat.
Pressure-treated lumber gives your mount extra strength. You want your solar panels to last, so pick quality wood. Treated wood resists rot and bugs. It’s less likely to warp than regular wood, but it can still change shape over time. Some users say their treated wood frames have stayed straight for years. The quality of treated wood keeps getting better.
Treated wood is less prone to warpage compared to other wood types, but it can still undergo dimensional changes over time.
Metal is generally more durable and has uniform properties, making it a better choice for supporting solar panels.
A user shared their experience with treated wood, noting that their structure has held up well without warping, suggesting that quality of treated wood has improved.
If you want the longest-lasting mount, you might choose metal instead of wood. Metal frames support solar panels better in harsh weather.
Metal poles make your mount even stronger. You can use steel or galvanized pipes for this part. Metal stands up to wind, rain, and snow. It’s a smart choice for big solar arrays or tough climates.
You need to anchor your metal poles deep in the ground. A post pounder helps you drive the poles without digging big holes. This tool saves time and keeps your mount stable. You can rent a post pounder at most tool shops.
Helical piles, also known as helical piers, are steel shafts with helical flights that are installed into the ground to which the solar panel racking is attached. They are twisted into the soil and do not require excavation, minimizing environmental impact. Drilled shaft piles can vary in size and are filled with high-strength cement grout or concrete, providing stability for solar arrays.
Some installers use helical piles for their solar mount. These steel shafts twist into the soil and hold your solar panels tight. You don’t need to dig, so you protect the land. Drilled shaft piles work well for heavy solar arrays. You fill them with concrete for extra strength.
Galvanized pipes are a top pick for solar mounts. The galvanizing process coats the steel with zinc. This layer protects your mount from rust and weather. Galvanized steel lasts longer than aluminum. It gives your solar panels a safe, solid base.
Galvanized steel is noted for its superior corrosion resistance compared to aluminum.
The galvanizing process offers both barrier and sacrificial protection, enhancing its durability in harsh environments.
Zinc-Aluminum-Magnesium C-Type Steel has a service life that can be 5 to 10 times longer than traditional galvanized steel, significantly reducing maintenance needs.
If you want even more protection, look for Zinc-Aluminum-Magnesium C-Type Steel. This material can last five to ten times longer than regular galvanized steel. You spend less time on repairs and your solar mount stays strong.
Note: Always check your local building codes before you start your solar mount. Some areas have rules about how deep you must anchor your poles or what materials you can use.
A strong mount keeps your solar panels safe and working well. Take your time with this step. Good planning and quality materials make your solar installation last for years.

You are about to do the most fun part. Installing solar panels means your project is almost finished. You need to pay close attention to where you put each panel. You also need to check the tilt and make sure each panel is secure. Let’s go through the steps to install solar panels so you get good results.
Putting your solar panels in the right place is very important. You want every panel to get lots of sunlight. First, look at your layout. Make sure nothing blocks the sun, like trees or buildings. Put your panels in rows with space between them. This stops shadows and helps your panels make more energy.
The space between rows depends on how tall your panels are. It also depends on the angle of the sun. If rows are too close, one row can make a shadow on the next. Planning helps you get the most solar energy.
Tilt is important for solar panels. You want your panels to face the sun at the best angle. The right tilt changes depending on where you live. Here is a table to help you find the best tilt for your area:
Region | Optimal Tilt Angle |
|---|---|
Southern Florida and Texas | 25-30° |
Central U.S. (e.g., Kansas, Ohio) | 38-40° |
Northern U.S. states (e.g., Minnesota, Maine) | 43-47° |
Southern Canada (e.g., Toronto, Vancouver) | 43-49° |
Northern Canada | 55-60° |
You can change the tilt of your solar panels for different seasons. In summer, use a lower tilt. In winter, use a steeper tilt to catch more sun. Some mounts let you change the tilt easily. If you want the most energy, check your tilt a few times each year.
Tip: Use a phone app or an angle finder to check your panel tilt. Small changes can help your solar panels make more energy.
Spacing is just as important as tilt. You want to stop shadows between rows. Here is how you can plan your spacing:
Measure how tall your panels are.
Find the solar altitude angle for your area.
Space the rows so one row’s shadow does not reach the next.
Careful spacing helps your solar panels work their best. If you have a big yard, you can spread out your panels more. If your space is small, you need to plan even more.
After you place your panels, you need to attach them to the mount. This step keeps your solar panels safe from wind and rain. You want strong fasteners that last a long time.
Picking the right fasteners is important for safety. You want materials that do not rust and can handle tough weather. Here is a table to help you choose the best fasteners:
Material Type | Corrosion Resistance | Application Example |
|---|---|---|
Stainless Steel | High | Exposed outdoor systems |
Aluminum | Moderate | Light rooftop arrays |
Carton Steel (10.9) | Variable (plated) | Heavy structural mounting |
When you install your solar panels, look for fasteners that have:
Corrosion resistance
Good strength
Fit with panel frames and mounting hardware
A good record in solar projects
The right fasteners keep your solar panels safe, even in strong wind or snow. They also make repairs easier later.
Note: Tighten bolts and screws well, but do not make them too tight. If you tighten too much, you can crack the panel frames.
You want your solar panels to last a long time. Damage can happen if you rush or use poor materials. Here is a table showing common causes of panel damage and how to stop them:
Common Causes of Panel Damage | Preventive Measures |
|---|---|
Structural Instability | Use good materials, get a pro to check your site, follow the maker’s rules. |
Corrosion | Use materials that do not rust, add coatings, check for problems often. |
Misalignment | Use GPS tracking, adjustable mounts, and check alignment often. |
Extreme Weather Challenges | Use wind-resistant racks, strong foundations, and mounts that can change tilt. |
Ground Erosion | Test the soil, use ground screws, and plant grass or other cover. |
Take your time with each step. Use strong materials and check your work often. If you see a problem, fix it right away. This helps your solar panels work better and last longer.
Callout: Always follow the maker’s instructions when you install solar panels. If you need help, ask Haina Solar for advice.
You are almost finished with your solar installation. Good placement, tilt, spacing, and strong mounting make your system work well. Now you can move on to wiring and connections, knowing your panels are ready.
Getting the wiring right is very important for solar panels. You want your solar system to be safe and give you lots of power. Let’s look at wiring, grounding, surge protection, and how to connect to the inverter and the grid.
There are two main ways to wire solar panels. You can use series wiring or parallel wiring. Each way has good and bad points.
Wiring Type | Advantages | Disadvantages |
|---|---|---|
Series | Costs less for wires and equipment; easy for DIY | If one panel is shaded or broken, others lose power |
Parallel | Panels work on their own, so more reliable | Costs more for wires and equipment |
In series wiring, you connect the positive of one panel to the negative of the next. This makes the voltage go up, but the current stays the same. In parallel wiring, you connect all positives together and all negatives together. This keeps the voltage the same, but the current goes up.
Wiring Type | Voltage Effect | Current Effect |
|---|---|---|
Series | Voltage goes up | Current stays the same |
Parallel | Voltage stays the same | Current goes up |
Series Wiring Example: Three 100W panels, each at 18V and 5.56A, give 54V and 5.56A.
Parallel Wiring Example: The same three panels in parallel stay at 18V, but current is 16.68A.
Most solar kits have MC4 connectors. These snap together and keep wires safe from water and dust. Always check your wiring with a diagram before you finish. If you are not sure, ask Haina Solar for help.
Tip: Label your wires as you work. This helps you fix problems later.
Grounding and surge protection keep your solar system safe. You need to follow the rules and use the right parts.
Plan your grounding system for your layout and soil. Use copper or galvanized steel rods. Keep ground wires short and tight. Try to keep resistance under 5 ohms. Connect all metal parts to earth ground. Check your ground wires often to make sure they are secure.
Put ground rods near your inverter and battery.
Use clamps that do not rust.
Check your grounding system every year.
Surge protection devices (SPDs) keep your solar panels safe from lightning and power surges. Here is a table:
Type | Description |
|---|---|
Type 1 | Stops damage from direct lightning strikes. |
Type 2 | Stops damage from nearby lightning strikes. |
Type 3 | Gives full protection, including surges. |
Put a Type 1+2 surge protector at your main panel.
Use a Type 2 device at your inverter’s AC output.
Keep SPD wires short—under 50 cm is best.
Note: Protect your communication lines with SPDs to stop surges.
You are almost done with your solar panel project. Now you need to connect your inverter and hook up to the grid.
Put your inverter in a safe, easy-to-reach spot.
Connect the inverter to your main panel with the right wires.
You may need an electrician for this step.
Your utility company will check your solar system.
An electrician will add a meter to track your energy use and production.
Check all wires to make sure they are tight and safe.
Make sure your panels face the sun.
Turn on your system and watch the power.
Callout: Always follow local rules and ask for help if you need it. Haina Solar can help you with any step in your solar panel project.
You have finished the hard work. Now it is time to make sure your solar system is safe and ready to go. This step helps you catch problems before you turn on the power. Let’s walk through the final checks and first test.
Before you flip the switch, you need to check every part of your solar setup. Safety comes first. You want to protect yourself, your home, and your new solar panels.
Start by looking at all the wires and connections. Make sure nothing is loose or damaged. Use this table to guide your inspection:
Safety Check | Description |
|---|---|
Fire Prevention | Check for loose connections, damaged insulation, and anything that could cause a fire. |
Electrical System Inspection | Look for corrosion, wear, or anything that could make the system unsafe. |
Labeling and Documentation | Make sure every part is labeled and you have all your paperwork and permits ready. |
Personal Protective Equipment | Wear insulated gloves, safety glasses, and non-conductive boots. |
You should also check that string fuses and circuit breakers work. Clean your solar panels so they do not overheat. Look for labels that show voltage and current ratings. Keep your safety documents and permits in a safe place.
You want your solar system to last a long time. Check that the frame is strong and the panels are secure. Make sure nothing is loose or wobbly. Use the right Personal Protective Equipment every time you work on your solar system. Insulated gloves, safety glasses, and fire-resistant clothing keep you safe. Always inspect your gear before you use it.
Tip: Never skip safety checks. A few minutes now can save you from big problems later.
Now you get to see your solar system in action. This is the exciting part! You will check if your panels make power and if everything works as planned.
You need some tools to test your solar system. Here are the most common ones:
Multimeter for checking voltage and current
Clamp meter for measuring current without disconnecting wires
Thermal imaging camera to spot hot spots on panels
Data logger to track performance over time
Start with a visual check. Look for dirt or damage on your solar panels. Next, use a multimeter. Set it to DC voltage mode. Attach the red lead to the positive terminal and the black lead to the negative terminal. Place the panel in sunlight. Write down the voltage you see.
If you find a problem, do not worry. Here are some quick steps:
If you see low voltage, check for loose wires or dirty panels.
If a panel feels hot, use a thermal camera to find the problem spot.
If your data logger shows low output, compare it to the expected numbers.
You can also use continuity testing to make sure all wires connect well. Insulation resistance testing helps you find leaks. I-V curve tracing lets you compare your solar output to what you expect.
Note: If you cannot fix a problem, ask a pro or reach out to Haina Solar for help.
You are almost done. Careful testing makes sure your solar installation is safe and ready to power your home.
Taking care of your solar panels helps them work well for a long time. You do not need to be an expert to do basic maintenance. You just need to know what to check and when to ask for help.
You want your solar panels to stay clean. Dust, leaves, and bird droppings block sunlight and lower energy. Here are some easy ways to keep your panels working well:
Wash panels with water and a soft brush every few months.
Remove leaves, twigs, and other debris after storms.
Trim grass and weeds near your solar array so they do not make shadows.
Check for bird nests or animal activity close to your panels.
Tip: Clean your panels early in the morning or late in the evening. The panels are cooler, and you avoid streaks.
You should check the hardware that holds your solar panels. Look for loose bolts, rust, or signs of damage. Make sure all parts are tight and secure. Check the frame and mounting system for rust. If you see any damage, fix it right away. You also want to check the wiring and inverter for problems.
Here is a quick checklist for solar maintenance:
Clean panels to remove dust and debris
Trim grass and weeds
Check for rust on frames and mounts
Inspect wiring and inverter performance
Watch for animals near your solar array
Schedule a yearly professional inspection
Sometimes your solar panels do not make as much power as before. Dirt, shade, or broken wires can cause this. You might see higher energy bills or your monitor showing lower numbers. If you notice less power, start by cleaning your panels and checking for shade. Look at your inverter display for error messages.
Loose wires or broken connectors can stop your solar system from working. You might see flickering lights or hear buzzing sounds. Always check the wiring during your inspection. If you find a problem, you can fix it or call a professional.
Here is a table showing common challenges and solutions for ground mount solar systems:
Challenge Type | Challenges | Solutions |
|---|---|---|
Alignment issues, tough installation, poor panel orientation | Adjustable racks, tracking mounts, grading | |
Rocky Terrain | Hard to anchor, higher labor costs, unpredictable expenses | Ballasted foundations, drilled piers |
Wetlands and Soft Soils | Weak support, soil erosion, tricky site preparation | Ballasted foundations, soil stabilization |
You can do most solar maintenance tasks yourself. If you see big problems, like damaged panels or wiring you cannot fix, call Haina Solar. You should also reach out if your system stops working or you need a professional inspection. Haina Solar offers expert help, replacement parts, and advice for any solar installation. You get peace of mind knowing your solar system stays safe and strong.
Note: Annual professional inspections help catch problems early and keep your solar panels working their best.
You have learned how to handle every setup step for ground mount solar panels. First, you plan your setup and check your space. Next, you clear and level the ground for a strong setup. You build the frame, anchor it, and make sure your setup stays secure. You place each solar panel, adjust the tilt, and space them for the best setup. You connect the wiring, ground your setup, and finish with a safe installation. Regular setup checks and cleaning help your solar setup last longer.
Over time, that means more opportunities to save money and lower your monthly electric costs.
A ground mount setup uses open land for solar power.
Your setup gives you flexibility and keeps your roof untouched.
You get more energy independence with your setup.
Ground-mounted solar setups can produce 20-25% more power than rooftop setups.
Your setup lets you pick the best spot for sun exposure.
More energy from your setup means bigger savings.
Stay safe with every setup. Clean your solar setup often. If you need help with your setup, reach out to Haina Solar for products, advice, or a professional setup. Solar energy gives you freedom and helps you save money. Your setup is a smart move for your future.
Most people finish a ground mount setup in two to five days. You might need more time if you have a big yard or tough soil. Planning helps you work faster.
Yes, you need a permit before you start. Check with your local building office. Rules change from place to place. Getting permits early saves you trouble.
You can install solar panels if you follow safety steps and use the right tools. Many DIY kits make the job easier. Ask for help if you feel unsure.
You should clean your panels every few months. Remove leaves and dirt. Check bolts and wires for damage. A yearly inspection keeps your system working well.
Pick a spot with lots of sunlight. Avoid shade from trees or buildings. Face your panels south if you live in the northern hemisphere. Use a level area for easy setup.
If you see cracks or broken wires, turn off your system. Clean the area and call a professional for repairs. Quick action keeps your solar system safe.
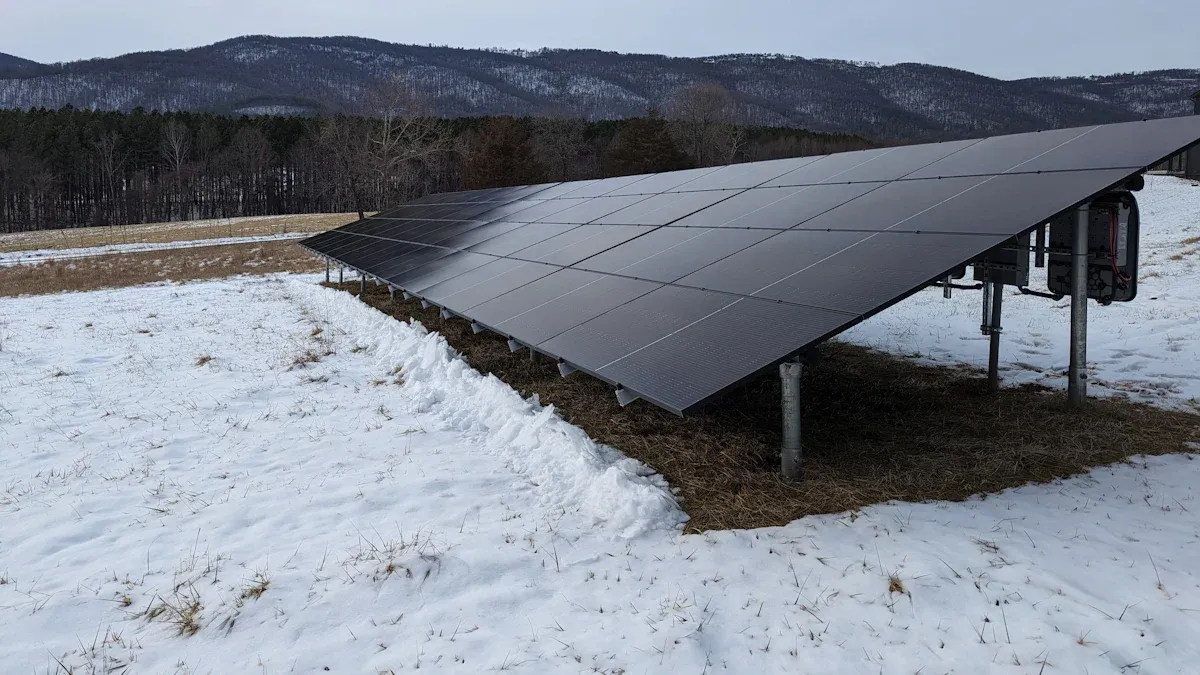
Solar panels work in winter, but snow and clouds can lower energy. Clean off snow and check for ice. Panels still make power on cold, sunny days.
You can add more panels to your ground mount setup. Make sure your inverter and wiring can handle extra power. Ask an expert before you upgrade.


