

Views: 0 Author: Site Editor Publish Time: 2025-11-10 Origin: Site


When you get a 10kw solar system kit, you get many key parts. These parts are solar panels, a solar inverter, batteries for storing energy, mounting hardware, wires and cables, setup instructions, and sometimes a battery management system (BMS). The table below gives a quick look at the main parts in these kits:
Component | Description |
|---|---|
Solar Panels | Take sunlight and make electricity |
Solar Inverter | Change solar energy into electricity you can use |
Lithium-based Batteries | Hold energy for night or cloudy times |
Mounting Hardware | Keep panels safe on your roof or ground |
Wiring and Cables | Link all system parts together |
Installation Instructions | Help you set up the system |
Optional BMS | Watch and protect how batteries work |
Your kit should give enough power for homes or small businesses. New batteries work better and last longer than older ones.
A 10kW solar system kit has important parts. It comes with solar panels, an inverter, batteries, and mounting hardware.
Solar panels turn sunlight into electricity. The number of panels depends on their wattage.
Inverters change solar energy from DC to AC. This makes the power work for homes. Pick an inverter that fits your panel wattage.
Batteries save energy for nighttime or cloudy days. Lithium batteries last long and work well.
Mounting hardware holds solar panels on roofs or the ground. Make sure it is strong for bad weather.
Wiring and cables link all the system parts together. Use the right sizes to keep energy safe and stop loss.
Installation instructions help you set up the system. Follow them carefully or get a professional to help.
You can plan for upgrades later. Adding more batteries or panels can make your solar system better and more flexible.

You get enough solar panels to make 10,000 watts. The number of panels depends on how strong each one is. Some kits have more panels with lower wattage. Other kits have fewer panels with higher wattage. Look at the table below for examples:
Number of Panels | Wattage per Panel | Total Wattage |
|---|---|---|
34-35 | 300W | 10kW |
20 | 500W | 10kW |
If you pick stronger panels, you need less of them. This makes putting them up easier and saves space. Always check the panel wattage before you buy your kit.
There are different kinds of solar panels in a 10kW kit. The most common are bi-facial and TOPcon panels. Bi-facial panels take in sunlight from both sides. This helps them work better. TOPcon panels use new technology to make more power. See the table below for some popular models:
Solar Kit Model | Power Output | Panel Type | Inverter Type |
|---|---|---|---|
Axitec 590 XXL bi-facial | 10.6 kW | Bi-facial | SMA Smart hybrid |
Axitec 550 XXL bi-facial | 10.4 kW | Bi-facial | SMA hybrid |
Canadian 445 black | 10.3 kW | TOPcon | SMA hybrid |
Bi-facial panels are good if you have shiny surfaces nearby. TOPcon panels are strong and work well. Pick the type that fits your roof and your energy needs.
Your kit comes with a solar inverter. The inverter changes DC from the panels into AC for your house or business. Most kits use hybrid inverters. Hybrid inverters work with both solar panels and batteries. You might get brands like SMA or SolarEdge.
You need to match your inverter to your solar panels. Here are some steps to help you:
Count your panels and multiply by their wattage. For example, 20 panels × 500 watts = 10,000 watts.
Divide your total by the DC-to-AC ratio. A common ratio is 1.25. For example, 10,000W ÷ 1.25 = 8,000W. You need an 8kW inverter.
Think about your weather. Hot days, shade, and roof direction can change what size you need.
Solar systems lose some power from wires, dust, and age.
Pick an inverter that is close to your needs. It is better to go a little bigger.
Always check the inverter details before you buy your kit.
Your kit might have lithium batteries for storing energy. These batteries save extra power for night or cloudy days. The battery size depends on how much energy you use. Lithium Iron Phosphate (LifePO4) batteries last a long time and hold lots of energy. They give you good storage and backup power.
A Battery Management System (BMS) keeps your batteries safe. The BMS balances the cells, checks how they work, and stops problems. Here are some main benefits:
Feature | Benefit |
|---|---|
Optimal battery cell balance | Makes energy use better |
Real-time performance monitoring | Helps your system work well |
Overcurrent protection | Keeps things safe while running |
Thermal regulation | Stops batteries from getting too hot |
Your kit is safer and works better with a BMS. The BMS also means less work for you and longer battery life.
Tip: Always see if your kit has a BMS. It makes your solar system safer and easier to use.
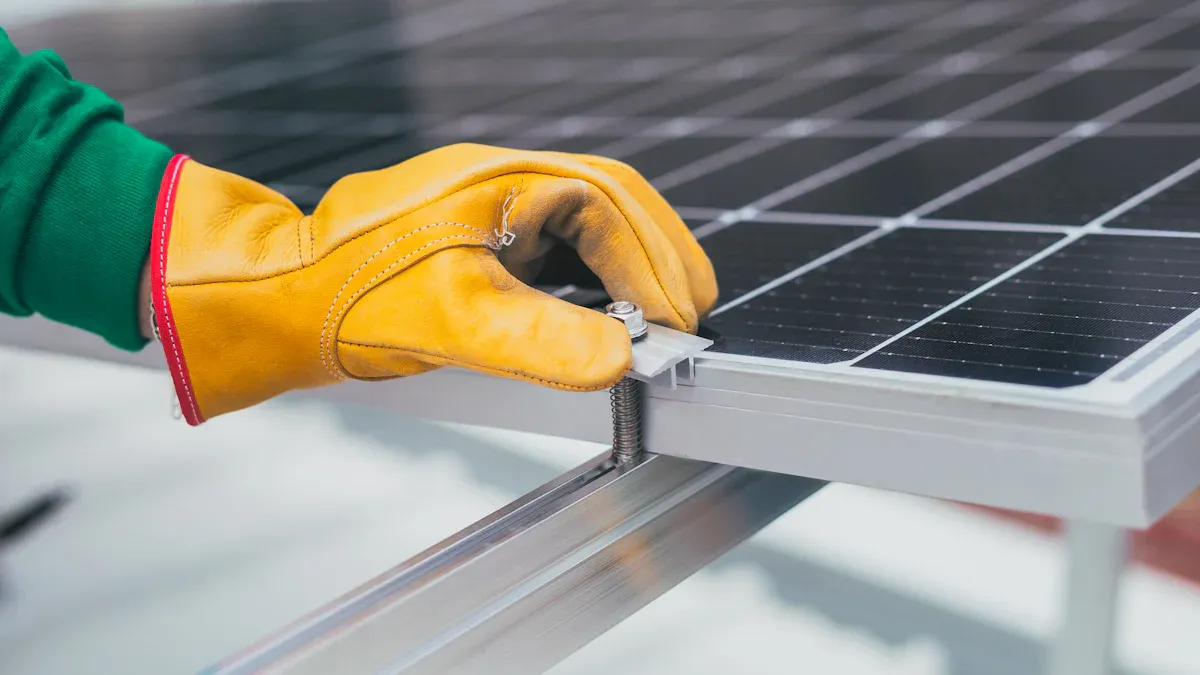
Mounting hardware keeps your solar panels safe and secure. You need strong parts to hold the panels in place, whether you put them on your roof or on the ground.
You can choose between roof mounts and ground mounts for your solar panels. Roof mounts attach panels directly to your roof. Ground mounts hold panels on a frame set into the ground. Each kit includes a range of hardware to fit different surfaces and needs. Here are some common items you will find in a 10kw solar system kit:
Rails
Flashings
Splice kits
Stopper sleeves
Conduit mounts
Attachments
Brace assembly
Base mount
Brackets
Bolts
Clamps
Caps
L-feet
Washers
Skirt
Lugs
Tilt legs
Hooks
Stand-offs
Ballast bay
Top of pole mount
Side of pole mount
Flush mount kits
Ground mount kits
Roof mount kits
Hardware packages
Wire management tools
These parts help you set up your system safely and make sure your panels stay in place during wind, rain, or snow.
Brackets and rack systems support your solar panels and keep them at the right angle. You want a system that is strong and fits your panels. Most kits use racks and brackets that meet industry standards. Look at the table below for important details:
Specification | Details |
|---|---|
Load-Bearing Capacity | Maximum static load of 5400Pa (snow load) and 60m/s (wind load) |
Compatibility | Supports mainstream PV modules up to 2200mm x 1300mm |
Maintenance | Regular checks 1-2 times per year; no special maintenance required |
Quality Certifications | ISO 9001/14001/45001, AS/NZS 1170, Rohs (optional) |
Warranty | 10 years for main structure, 25 years for galvanized coating |
You should check your brackets and racks for rust or loose bolts once or twice a year. Most systems last a long time and come with strong warranties.
Wiring and cables connect all the parts of your solar system. You need the right size and type to keep your system safe and working well.
Your kit includes both DC and AC cables. DC cables carry power from the panels to the inverter. AC cables move power from the inverter to your home or business. The table below shows the common sizes you will find:
Cable Type | Size |
|---|---|
DC Cable | 16mm² |
AC Cable | 6mm² |
You should use the cables that come with your kit. They match the power needs of a 10kw solar system and help prevent energy loss.
Connectors join cables to panels, inverters, and batteries. You will find MC4 connectors, lugs, and other types in your kit. These connectors make sure your system is safe and easy to set up. Always check that connectors are tight and free from dirt or water.
Tip: Use only the connectors and cables that come with your kit. This helps you avoid problems and keeps your warranty valid.
Your kit comes with clear installation instructions. These guides help you set up your system step by step.
If you want to install your system yourself, follow the instructions closely. The guide will show you how to:
Lay out your panels
Attach mounting hardware
Connect wiring and cables
Set up the inverter and batteries
Test your system
Most kits include diagrams and safety tips. If you have questions, contact the kit supplier or a solar professional. You can also find videos and extra guides online.
Note: Installing a 10kw solar system takes time and care. If you are not sure about any step, ask for help from a licensed installer.
You can make your solar kit better by adding more batteries. Extra batteries let you save more energy for later. This is helpful at night or when the power goes out. Many people add 20–30 kWh of battery storage to their system. This upgrade lets you use more of your own power and keeps your lights on during blackouts.
A 10kw solar system with battery backup costs about $27,500 before any discounts.
You will need about 25–27 solar panels and 40–90 m² of roof space.
More batteries help you use less grid power and keep your home running if the grid fails.
If you want to use more solar power and depend less on the grid, think about adding more batteries. This can also help you save money if your utility charges more during busy times.
Tip: Make sure your inverter can handle extra batteries before you buy them.
Power optimizers are small devices that go on each solar panel. They help your system work better, even if some panels get shade or dirt. Power optimizers make sure each panel does its best job.
Benefit | Description |
|---|---|
Maximizes Energy Production | Power optimizers watch each panel and help make more energy. |
Enhances Safety | SafeDC lowers high DC voltage to safer levels. |
Improves System Efficiency | Each panel works better, so the whole system is more efficient, even in shade. |
Early Problem Detection | Optimizers find problems early, so you can fix them fast. |
Flexibility in Installation | You can put panels at different angles or on different roof sides without losing power. |
If your roof has different angles or gets shade, power optimizers help you get more energy. They also help you find problems sooner.
Note: Some kits come with power optimizers, but you can add them later if you want.
Smart meters help you see how much energy your solar system makes and uses. You can check this on your phone or computer. This helps you learn about your energy use and find ways to save.
With smart meter integration, you can:
Watch your solar power and home energy use.
Get alerts if something is wrong with your system.
See how much energy you send back to the grid.
Make better choices about when to use your appliances.
Smart meters make it easy to control your solar system and get the most from it.
Tip: Ask your installer if your kit works with smart meters. Some utilities give rebates if you use a smart meter.
When you build a 10kW solar system, you need to keep it safe from power surges. Surges can happen because of lightning, changes in the power grid, or when big switches turn on and off. These fast jumps in voltage can hurt your inverter, solar panels, and batteries. Surge protection devices, called SPDs, help stop this damage and keep your system working for a long time.
There are different kinds of surge protection devices. Each kind works best in a certain spot in your solar system. The table below shows the main types, what they do, and where you put them:
Type | Use Case | Waveform | Location |
|---|---|---|---|
Type 1 | Direct lightning (high energy) | 10/350 µs | Between the array & main disconnect |
Type 2 | Indirect surges, switching | 8/20 µs | Inverter input, MPPT, combiner box |
Type 3 | Final protection at the load end | Fast transient | Monitoring, comm ports |
Type 1+2 | Combined for full range | 10/350 + 8/20 µs | Critical systems (large PV plants) |
Type 1 SPDs help protect your system from lightning that hits directly. You put these between your solar panels and the main switch. Type 2 SPDs protect against smaller surges and switching. You put these at the inverter, MPPT, or in the combiner box. Type 3 SPDs give extra safety at the end, like at monitors or communication ports. Some big solar systems use Type 1+2 SPDs for even more protection.
You should make sure your surge protection devices follow the right rules. Look for ones that meet IEC 61643 or UL 1449. These rules help make sure the devices work well and keep your system safe.
Here are some reasons to use surge protection in your solar kit:
Keeps your inverter, panels, and batteries safe from harm
Cuts down on repairs and system downtime
Helps your system work during storms or power changes
Makes it easier to meet insurance and warranty rules
Tip: Always put surge protection devices in the right spot. Follow your kit’s instructions and check local rules.
You can add surge protection devices when you buy your kit or later. Some kits come with basic SPDs, but you might want stronger ones if you get lots of storms or have power problems. Ask your installer which type is best for your home or business.
If you want your solar system to last and work well, surge protection is a good idea. It helps you worry less and saves money on fixing things. Check your kit for SPDs and add more if you need them.
When you buy a solar kit, you get the main equipment, but you do not get the work needed to put it all together. Installation labor is not part of most kits. You must either install the system yourself or hire a professional installer. If you choose to do it yourself, you need to follow the instructions closely and make sure you meet all safety rules. Many people hire licensed electricians or solar installers to make sure the job is done right. Labor costs can change based on where you live, the size of your roof, and how complex the job is. Always ask for a quote before you start.
Tip: Professional installation can help you avoid mistakes and keep your warranty valid.
You need special permits and inspections before you can use your solar system. These are not included in your kit. Local rules decide which permits you need. Most places require you to get approval before you start work. After you finish, inspectors check your system to make sure it is safe and follows the rules.
Here is a table that shows the common permits and inspections for a 10kw solar system:
Permit/Inspection Type | Description |
|---|---|
Electrical Permit | Makes sure your wiring and connections are safe. |
Building Permit | Needed if you change your roof or building structure. |
Renewable Energy Permit | Some places need this for solar projects. |
Electrical Inspection | Checks your wiring and grounding after installation. |
Final System Inspection | Looks at the whole system to make sure it works and is safe. |
You should check with your city or county office to find out what you need. Permit fees and inspection costs are not part of your kit price.
You need special tools to install your solar system. These tools do not come with most kits. If you plan to install the system yourself, you must have the right equipment. Some tools help you connect wires, while others help you attach panels to your roof or ground mount.
Here is a table of common tools you might need:
Tool Type | Description |
|---|---|
Tools Bag | Holds all your installation tools |
MC4 spanner | Connects solar panels safely |
Crimping pliers | Secures electrical connections |
Wire stripper | Prepares wires for connections |
You may also need items like cables, connectors, fused disconnects, bypass switches, and distribution blocks. These help you finish the job and keep your system safe.
Note: If you do not have these tools, you can rent or buy them from hardware stores or solar suppliers.
When you buy a 10kW solar system kit, you need to know about utility fees. These fees are not part of your kit. You pay them to your local power company when you connect your solar system to the grid. Utility fees can change based on where you live and how your power company works.
You may see different types of utility fees. Here are some common ones:
Interconnection Fee: You pay this fee to link your solar system to the power grid. The fee covers the cost for the utility to check your system and make sure it works safely.
Net Metering Fee: Some power companies charge a fee for net metering. Net metering lets you send extra solar power back to the grid. You get credits for this power, but you may pay a small monthly fee for the service.
Application Fee: You pay this fee when you apply to connect your solar system. The utility uses this fee to process your paperwork.
Inspection Fee: The utility may charge you to inspect your solar system before you turn it on.
Monthly Service Fee: Some utilities charge a fixed fee each month for having solar panels, even if you use little or no grid power.
Here is a table to help you see the main utility fees you might pay:
Fee Type | What It Covers | Typical Cost Range |
|---|---|---|
Interconnection Fee | Connects your system to the grid | $100 – $500 |
Net Metering Fee | Tracks power sent to the grid | $5 – $20 per month |
Application Fee | Processes your solar paperwork | $50 – $250 |
Inspection Fee | Checks your system for safety | $75 – $300 |
Monthly Service Fee | Keeps your account active | $10 – $30 per month |
You should ask your utility company about these fees before you buy your kit. Some places have higher fees, while others have lower costs. The fees can change each year, so check for updates.
Tip: Call your local utility before you start your solar project. Ask for a list of all fees and charges. This helps you plan your budget and avoid surprises.
You may also need to pay for upgrades to your electric meter or service panel. The utility will tell you if you need these changes. These costs are not part of your solar kit.
If you want to save money, look for rebates or credits from your utility. Some companies offer rewards for using solar power. You can ask about these programs when you talk to your utility.
Utility fees are a normal part of setting up a solar system. You pay them to make sure your system works with the grid and follows all rules. By learning about these fees, you can plan your solar project better and avoid extra costs.
Before you start, make sure your kit has all the parts. A full list helps you not miss anything or have delays. Open each box and check the parts with the list below. This table shows what you should get in a normal 10kW solar system kit:
Component | Qty |
|---|---|
EG4 6000XP Off-Grid Inverter | 1 |
11ft 10AWG PV Wire Extension (Black & Red) | 1 |
Stäubli MC4 Male and Female Connector | 2 |
IMO DC Disconnect Rooftop Isolator Switch | 2 |
84in 1 AWG Battery to Inverter Cables | 1 |
Midnite Solar Lightning and Surge Arrestor | 2 |
Wire Ratchet and Crimp Tool | 1 |
PV 2 Wire Management Clip (50 Pack) | 1 |
100ft 10 AWG Copper PV Wire (Black and Red) | 2 |
EG4 LifePower4 Lithium Battery 5.12kWh | 2 |
EG4 BrightMount Solar Panel Ground Mount Kit | 4 |
Aptos 370W Bifacial Solar Panel | 16 |
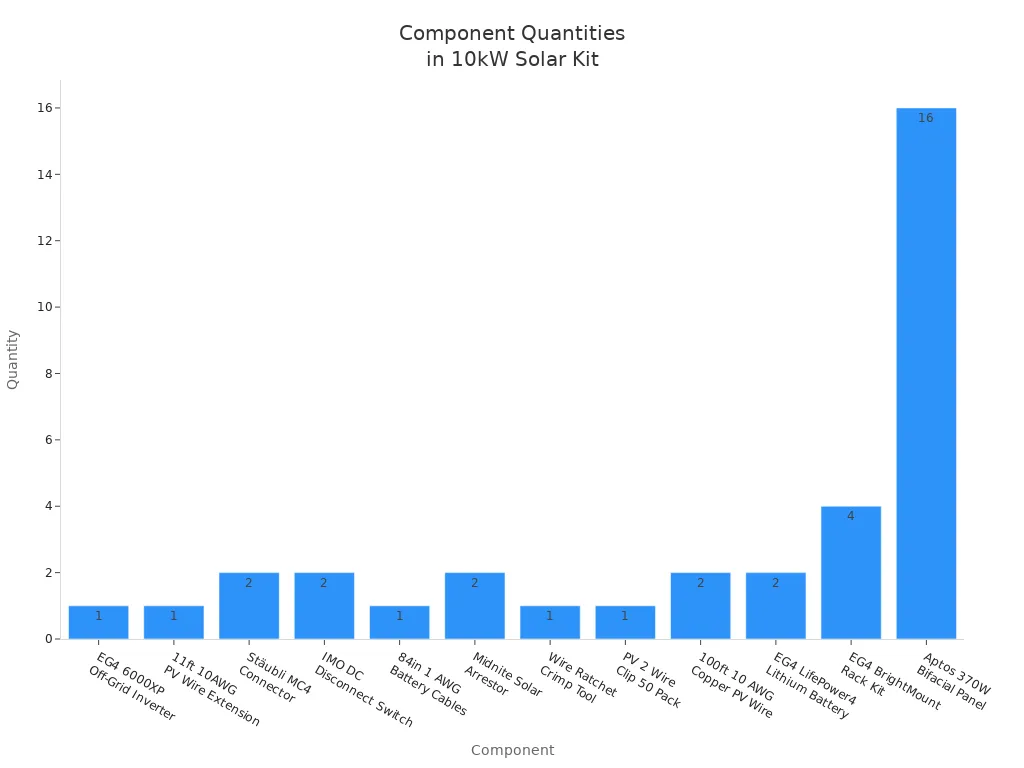
Tip: Count every part before you start building. If you are missing something, tell your supplier right away.
All the parts in your kit need to work together. Check the voltage and current for your inverter, batteries, and solar panels. Look at the connectors and cables to see if they fit together. If you want to add more batteries or panels, see if your inverter can handle it. Make sure the mounting hardware fits your roof or ground.
Here is a simple checklist to help you:
Match your inverter rating to your total panel watts.
Make sure battery voltage fits what the inverter needs.
Check connector types (MC4, lugs) for all cables and panels.
Look at the mounting kit size for your roof or ground.
See if surge protection devices fit your system’s voltage.
Note: If you are not sure about compatibility, ask your supplier or a solar installer for help.
You want your solar kit to last a long time. Check the warranty and support before you buy. Most solar panels have a warranty for up to 25 years. Inverters usually have a 5 to 10 year warranty. Some companies let you buy more years for extra coverage.
Here is a table that shows common warranty and support features:
Warranty Type | Duration/Details |
|---|---|
Manufacturer Warranty | Up to 30 years |
Technical Support | Lifetime |
Performance Monitoring | 24/7 via web and smartphone |
Installation Instructions | Provided |
System Design and Permit Plan | Includes electrical drawing and engineering |
Shipping | Flat-rate with lift-gate service to continental U.S. |
You also get technical support for as long as you own the system. Many kits let you watch your system on your phone or computer any time. You get instructions and plans to help with permits.
Solar panel warranties can last up to 25 years.
Inverter warranties are usually 5 to 10 years.
You can buy more warranty time if you want extra protection.
Tip: Keep your warranty papers safe. If you need help, use the contact info in your kit to reach support.
You need the right paperwork for your solar project. Good records help you follow safety rules and local laws. When you buy a 10kW solar system kit, check that you get all the documents you need. These papers help with installation, approval, and support.
Look for a clear installation manual first. This guide shows you how to set up each part. It has step-by-step instructions, diagrams, and safety tips. The manual helps you avoid mistakes and keeps your system working well.
You also need technical datasheets for every main part. These sheets list details for your solar panels, inverter, batteries, and mounting hardware. You use this information to check if parts work together and perform well. If you need to replace something, the datasheet helps you find the right part.
Warranty papers are important too. These documents show how long your equipment is covered and what help you can get. Keep these records safe. If something breaks, you can use your warranty for repairs or replacements.
You must collect permits and inspection records. Local rules say you need approval before you install your system. You will need:
Building permit for checking structure and electrical plans
Electrical permit for safety and code checks
Utility interconnection permission to connect to the grid
Final inspection for system approval
These papers show your system is safe and legal. You may need to show them to your utility company or insurance provider.
A table can help you keep track of your documents:
Document Type | Purpose | Who Issues It |
|---|---|---|
Installation Manual | Shows setup and safety | Kit Manufacturer |
Technical Datasheet | Lists details for each part | Manufacturer |
Warranty Certificate | Proves coverage and support | Manufacturer/Supplier |
Building Permit | Approves structure and electrical plans | Local Government |
Electrical Permit | Checks wiring and safety | Local Government |
Utility Interconnection | Lets you connect to the grid | Utility Company |
Final Inspection Report | Confirms system is ready and safe | Inspector/Authority |
Tip: Keep copies of all your documents in a folder or on your computer. You will need them for upgrades, warranty claims, or if you sell your home.
Ask your supplier for a system design plan too. This plan has electrical drawings and engineering details. It helps you and your installer see how everything fits together.
If you want your solar project to go smoothly, gather all your documents before you start. Good records protect you and help your system last for years.
You need to know how much electricity your home or business uses before you buy a solar kit. Start by looking at your electric bills from the past year. Write down the highest and lowest amounts of energy you use each month. This helps you see if a 10kW solar system will cover your needs. If you use more power in summer or winter, you may need extra panels or batteries.
Think about your future plans. If you want to add electric cars, heat pumps, or more appliances, your energy use will go up. Make a list of all big devices in your home. Add up their wattage to get a clear picture. You can use online calculators to help you estimate your total energy needs.
Tip: Always plan for a little extra power. This gives you a buffer for new devices or changes in your lifestyle.
You must check your roof or ground space before you buy a solar kit. Measure the area where you want to put the panels. Most homes need between 40 and 90 square meters for a 10kW solar system. Look for spots that get the most sunlight during the day. Avoid areas with shade from trees, chimneys, or other buildings.
Roof orientation matters. South-facing roofs get the most sun in the United States. If your roof faces east or west, you may need more panels to get the same power. Check the angle of your roof. Flat roofs need special mounts to tilt the panels. Make sure your roof is strong enough to hold the weight of the panels and mounting hardware.
If you do not have enough roof space, you can use ground mounts. These let you place panels in your yard or on open land. Ground mounts work well if you have lots of space and want easy access for cleaning and maintenance.
You should compare different solar kits before you make a choice. Look at the size and layout of the solar panels. Some kits use larger panels, which means you need fewer of them. Others use smaller panels that fit better on complex roofs.
Check the costs and see if you qualify for rebates or tax breaks. These can lower the price of your solar kit. Ask your supplier about available incentives in your area.
Review the warranty for each part of the kit. Solar panels often come with warranties from 5 to 25 years. Inverters and batteries may have shorter warranties. Longer warranties give you peace of mind and protect your investment.
Consider installation factors. Look at the roof orientation, shading, and sunshine hours. Choose a kit that matches your home’s conditions. Some kits include extra features like surge protection or smart meters. These upgrades can make your system safer and easier to use.
Here is a table to help you compare key features:
Feature | What to Check |
|---|---|
Panel Size & Layout | Fits your roof and sunlight exposure |
Costs & Incentives | Total price, rebates, tax credits |
Installation Needs | Roof direction, shade, sunshine |
Warranty | Years of coverage for each part |
Note: Take your time to compare kits. Ask questions and read reviews to find the best option for your home or business.
When you buy a 10kW solar system kit, think about upgrades you might want later. Planning now helps you save money and avoid trouble in the future. You may want to add more panels, batteries, or smart features as your needs change.
Why plan for upgrades?
Your energy use could go up. You might get an electric car or new appliances.
Technology gets better every year. New batteries and smart devices can improve your system.
Utility rules might change. You may need new features to follow new standards.
Steps to plan for upgrades:
Check your inverter capacity.
Make sure your inverter can handle extra panels or batteries. Some inverters let you add more power without buying a new one.
Choose flexible mounting hardware.
Pick racks and brackets that fit more panels. If you want to expand, you will not need new mounts.
Select modular batteries.
Modular batteries let you add more storage easily. You can start with a small battery and add more later.
Look for smart system features.
Smart meters, monitoring apps, and power optimizers help you track your system. These features make upgrades easier.
Check compatibility.
Make sure new parts will work with your current system. Ask your supplier about upgrades before you buy.
Upgrade options you might consider:
Upgrade Type | Benefit | What to Check |
|---|---|---|
Extra solar panels | More energy production | Inverter and mount capacity |
More batteries | Longer backup power | Battery type and voltage |
Power optimizers | Better performance in shade | Panel compatibility |
Smart meter | Easy energy tracking | App and system support |
EV charger | Charge electric vehicles | Electrical panel capacity |
Tip: Ask your installer if your system supports upgrades. Some kits make it easy to add new parts.
Common mistakes to avoid:
Getting a kit with no space for extra panels.
Picking a small inverter that cannot handle more power.
Using fixed batteries that do not allow expansion.
Not checking local rules for upgrades.
Keep all manuals and datasheets. These papers help you when you want to upgrade. If you plan well, you can grow your solar system as your needs change.
Note: Good planning helps you spend less and get more from your solar kit. Always think about the future when you choose your system.
You can put in a 10kW solar system kit by yourself. You can also hire a professional to do the job. If you want to do it yourself, follow the instructions in your kit. Use the right tools and wear safety gear. Most kits have easy diagrams and guides. Check your local rules before you start. Some places need a licensed installer for solar systems.
Professional installers know how to set up wiring and mounts. They handle permits and inspections for you. You feel safer when an expert does the work. Your warranty usually stays good with professional installation. If you want to save time and avoid mistakes, hire a professional.
Tip: If you are not sure about electrical work or roof safety, hire a certified installer.
You need to keep your solar system clean and working well. Regular care helps your system last longer and work better. Here are some important things to do:
Clean solar panels often to get rid of dust.
Check the inverter for error codes and make sure it works.
Look at batteries for wear, rust, and tight connections.
Check your solar panels every three months. Clean them every month if you live where it is dusty.
Have a technician look at your inverter once a year.
Watch your electricity levels to find problems early.
Trim trees or bushes that block sunlight from your panels.
Use a soft brush or cloth to clean panels. Do not use strong chemicals. If your power drops, check for dirt or shade. Batteries need tight connections and no rust. Inverters should show normal numbers and no warning lights.
Note: Good care keeps your solar system safe and working well. Set reminders to check your system often.
Sometimes your solar system may have problems. You can fix many issues by checking a few things. Start by making a list of all your appliances. This helps you see how much power you use and find overloads.
Different appliances use different amounts of power. If you see low energy or errors, check which devices are on. You can use other energy sources like natural gas or propane for some appliances. This helps your solar system work better.
Your kit’s manual has troubleshooting guides. Many suppliers give phone or online help. Forums and user groups share tips for common problems. If you see error codes on your inverter, look them up or call support.
Make a list of appliances to track power use.
Check for error codes on the inverter.
Look at battery connections and clean panels.
Ask your supplier for help if you cannot fix the problem.
Keeping records and paying attention helps you fix problems fast and keeps your solar system working well.
You get solar panels, an inverter, batteries, mounting hardware, cables, and instructions in a 10kW solar system kit. Check your kit to make sure you have every part. Make sure all the pieces work together. Use this checklist:
Count each part before you start.
Match voltage and connectors for safety.
Look at warranty and support papers.
Tip: Ask a solar expert if you have questions or need help with installation. Planning carefully helps your system last longer and work better.
You can power a large home or a small business with a 10kW solar system. Most homes with high energy use find this size enough for daily needs.
You do not need batteries, but they help store energy for night or cloudy days. Batteries give you backup power and let you use more solar energy.
You need about 430 to 970 square feet of roof space. The exact area depends on the panel size and type you choose.
You can install the kit if you follow instructions and use the right tools. Many people hire professionals for safety and to meet local rules.
You should clean panels, check connections, and watch for error codes. Regular checks keep your system working well and help you spot problems early.
Most solar panels last 25 to 30 years. You get a long warranty with most kits. Panels lose a little power each year, but they keep working for decades.
Your kit works during outages only if you have batteries or a special inverter. Standard grid-tied systems shut off for safety when the grid goes down.
You need installation manuals, technical datasheets, warranty papers, and permits. Keep these documents safe. You may need them for inspections or upgrades.


